Quickstart
This page is the canonical quickstart for nitid. It covers the shortest path to first inference, the common train/val/export workflow, and the main differences for users coming from a YOLO codebase.
Installation
pip install "nitid[train]"
Add extras only when you need them:
pip install "nitid[track]"     # ByteTrack, BoT-SORT, and OC-SORT tracking
pip install "nitid[openvino]"  # OpenVINO IR export and runtime
Working on nitid itself? That uses a source
checkout with uv — see Development
in the README.
First Run
Create a model using a supported nitid model name. nitid will automatically download, wrap, and load the corresponding checkpoint on first use.
from nitid import NITID

model = NITID("model1s", task="detect")
results = model.predict("image.jpg", conf=0.5)
results[0].save("out.jpg")
results[0].boxes.xyxy is already in absolute pixel coordinates, so no manual
rescaling is needed.
For instance segmentation, select the task when constructing the model:
model = NITID("model1s", task="segment")
result = model.predict("image.jpg", conf=0.5)[0]

boxes = result.boxes.xyxy
masks = result.masks.data       # uint8 [N, H, W]
polygons = result.masks.xyn     # normalized polygons
result.save("segmented.jpg")
Segmentation defaults to the official COCO-pretrained mask weights.
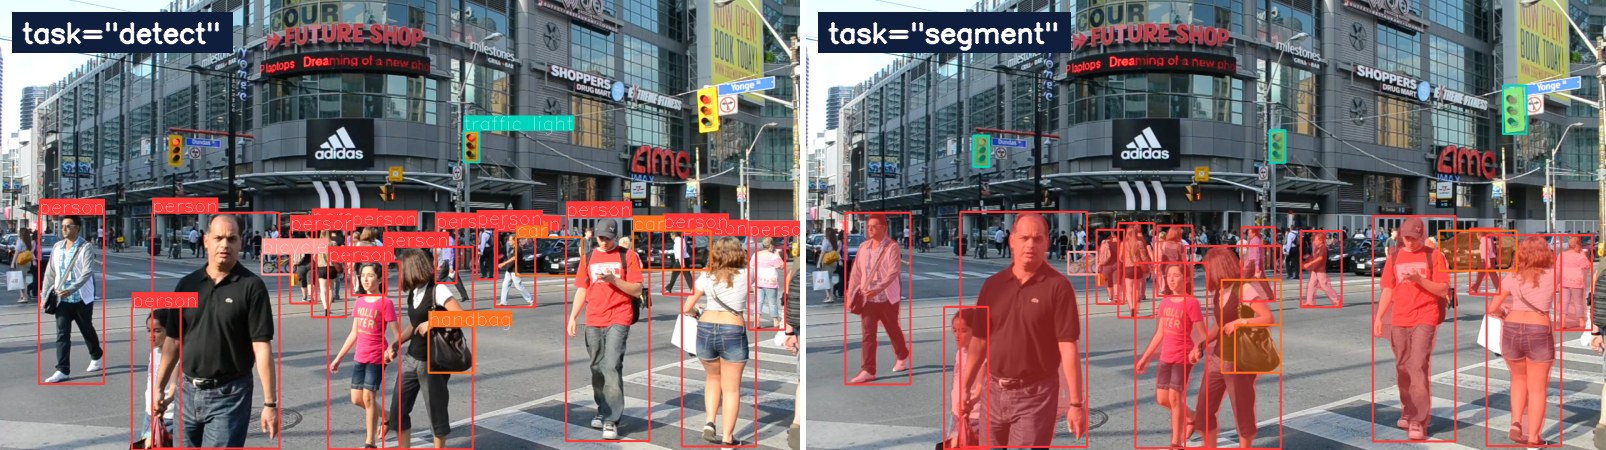
The same street frame with model1s and conf=0.5, task="detect" on the
left and task="segment" on the right:
For dense semantic segmentation, read the original-resolution class map from
result.semantic.mask. There are no pretrained semantic weights yet:
NITID("model1s", task="semantic") initializes the shared features from the COCO
instance-segmentation checkpoint and is meant for fine-tuning.
Predict with your fine-tuned checkpoint:
semantic = NITID("semantic_best.pth", task="semantic")
result = semantic.predict("image.jpg", save=True, return_probs=True)[0]

class_map = result.semantic.mask       # int64 [H, W]
probabilities = result.semantic.probs  # float [C, H, W]
result.save_semantic("class_ids.png")
save=True writes an annotated overlay and a lossless class-ID PNG in the
run's masks/ directory.
Common Workflow
Use the same model object for inference, training, validation, and export:
from nitid import NITID

model = NITID("model1s", task="detect")

# Inference
results = model.predict("image.jpg", conf=0.5)
results[0].save("out.jpg")

# Tracking (requires: pip install "nitid[track]")
for result in model.track("video.mp4", conf=0.5, stream=True, save=True):
    track_ids = result.boxes.id

# Training
model.train(
    data="configs/datasets/my_dataset.yml",
    epochs=50,
    batch=8,
    lr0=1e-4,
    optimizer="AdamW",
)

# Detection-only DEIM recipe.
model.train(
    data="configs/datasets/my_dataset.yml",
    epochs=50,
    recipe="deim",
)

# Validation
metrics = model.val(data="configs/datasets/my_dataset.yml")

# Export
model.export(format="onnx")
model.export(format="openvino")
model.export(format="torchscript")
model.export(format="tensorrt")
Detections can also be exported to tabular data for analysis:
result = results[0]
df = result.pandas()
same_df = result.to_df()
result.to_csv("out.csv")
crops = result.crop()          # cropped objects as numpy arrays + metadata
result.crop(save_dir="crops")  # save crops into class-name folders
See fine_tuning.md for dataset format, optimizers, AMP, EMA, and validation details. See export.md for TensorRT, FP16, and advanced export options.
Tracking processes frames in source order and returns the normal Results
objects with persistent IDs in result.boxes.id. With save=True, the
annotated video defaults to runs/track/exp/video.mp4. Prefer stream=True
for video and live sources so results are not retained in memory.
Live RTSP and HTTP cameras are read through OpenCV's default FFmpeg backend. Pass credentials separately rather than in the URL; the password stays out of results and saved run metadata:
import os

for result in model.track(
    "rtsp://camera/live",
    rtsp_username="viewer",
    rtsp_password=os.environ["CAMERA_PASSWORD"],
    conf=0.5,
    stream=True,
):
    track_ids = result.boxes.id
See authenticated RTSP cameras for the CLI equivalent.
Working with checkpoints
Official model names such as model1s with task="detect", task="segment",
or task="semantic" download the matching supported checkpoint automatically. Training
runs save self-contained .pth files with the architecture config and class
names embedded, so a saved checkpoint can be moved and loaded directly:
model = NITID("runs/train/exp/best.pth", task="detect")
Low-level raw checkpoint conversion still exists for maintainers and unusual research workflows, but it is not part of the normal quickstart path.
You can also export detections directly into tabular data for analysis:
result = results[0]
df = result.pandas()       # pandas DataFrame
same_df = result.to_df()   # alias for pandas()
result.to_csv("out.csv")   # write detections to CSV
3. Fine-tune on your data
Prepare a COCO-format dataset and a data YAML (see fine_tuning.md):
metrics = model.train(
    data="configs/datasets/my_dataset.yml",
    epochs=50,
    batch=8,
    lr0=1e-4,
    optimizer="AdamW",
)
# final summary lives at the top level; per-epoch rows are in metrics["history"]
For a complete runnable example, train on COCO-mini:
uv run python examples/train_coco_mini.py --task detect
uv run python examples/train_coco_mini.py --task segment
The example uses configs/datasets/coco-mini.yml, which downloads a small
COCO-format dataset with redistributable image licences on first use. The
training notebook runs the same dataset through training, validation,
prediction and export, and opens in Colab.
Epoch checkpoints are saved as wrapped .pth files and can be loaded directly with
NITID("epoch50.pth", task="detect") — config and names travel with the weights.
Coming from YOLO
nitid has a simple and familiar interface, so most migrations are a one-line import swap.
Loading a model
# Before
from ultralytics import YOLO
model = YOLO("yolo11n.pt")

# After
from nitid import NITID
model = NITID("model1s", task="detect")
Results access
results = model("image.jpg", conf=0.5)

for i in range(len(results[0].boxes)):
    x1, y1, x2, y2 = results[0].boxes.xyxy[i].tolist()
    conf = results[0].boxes.conf[i].item()
    name = results[0].names[int(results[0].boxes.cls[i])]

boxes_n = results[0].boxes.xyxyn
boxes_wh = results[0].boxes.xywh
boxes_whn = results[0].boxes.xywhn

json_data = results[0].to_json()
df = results[0].pandas()
crops = results[0].crop()
Streaming, training, and export
for r in model.predict("video.mp4", stream=True):
    annotated = r.plot()

for r in model.track("video.mp4", stream=True, conf=0.5):
    track_ids = r.boxes.id

model.train(data="my_dataset.yml", epochs=50, batch=16)
model.train(data="my_dataset.yml", epochs=50, recipe="deim")  # detection only
model.train(data="my_dataset.yml", epochs=50, amp=True, ema=True)

metrics = model.val(data="my_dataset.yml")
# {"mAP50-95": ..., "mAP50": ..., "AR1": ..., "AR100": ..., "precision": ..., "recall": ...}

# Model info
model.info()
# [D-FINE] 31.4M params (31.4M trainable)  120.3 GFLOPs  98.6 MB

# Export
model.export(format="onnx")
model.export(format="openvino")
model.export(format="torchscript")
model.export(format="tensorrt", half=True)
Capture a Python API bug report
from nitid import NITID, bugreport

with bugreport("prediction") as report:
    model = NITID("model1s", task="detect")
    results = model.predict("image.jpg")

print(report.path)
The report contains the shared environment snapshot and all stdout/stderr. A failure traceback is added to the same log before the original exception is re-raised.
Key differences from Ultralytics YOLO
| Feature | Ultralytics YOLO | nitid |
|---|---|---|
| Checkpoint format | .pt (architecture inferred from filename) |
.pth (config embedded inside) |
| Official weights | Download directly | Downloaded and prepared automatically |
model.info() |
Returns param/FLOP stats | Supported — params, GFLOPs, size on disk |
| TensorRT export | Supported | Supported (see export.md) |
| AMP / EMA training | Supported | Supported (amp=True, ema=True) |
model.task |
"detect", "segment", ... |
"detect", "segment", or "semantic" |
CLI
Use the CLI when you want to run nitid from the terminal instead of Python.
Run prediction and save the annotated image:
nitid predict model=model1s task=detect source=image.jpg save=true conf=0.5
This automatically downloads the matching checkpoint on first use, runs detection
on image.jpg, and saves the annotated image to:
runs/detect/exp/image.jpg
Choose your own output folder name:
nitid predict \
    model=model1s task=detect \
    source=image.jpg \
    save=true \
    project=runs/detect \
    name=street-test
The saved image will be:
runs/detect/street-test/image.jpg
Track a video and save annotations with persistent IDs:
pip install "nitid[track]"
nitid track model=model1s task=detect source=video.mp4 conf=0.5 save=true
The tracked video defaults to runs/track/exp/video.mp4.
Other common CLI commands:
nitid train model=model1l task=detect data=my_dataset.yml epochs=50
nitid train model=model1l task=detect data=my_dataset.yml epochs=50 recipe=deim
nitid val model=model1l task=detect data=my_dataset.yml
nitid export model=model1l task=detect format=onnx
train: fine-tune a model on a supported dataset YAML.val: run task-appropriate evaluation on the validation or test split.export: create an ONNX, OpenVINO IR, TorchScript, or TensorRT deployment artifact where supported by the selected task.
By default, train writes wrapped epoch checkpoints to runs/train/exp/, while val prints metrics to the terminal without creating a run directory.
Show all prediction or tracking options:
nitid predict --help
nitid track --help